Tuesday, 5 January 2021

My Eclipse favorite configurations

 My Eclipse favorite configurations

Enable auto activation triggers for Java

Many times you are wondering how come any programmers can type so fast. Trust me, with auto recommendation feature in Eclipse, you can be fast as well. you just need a little bit of configurations.


Go to Preferences->Java->Editor->Content Assist

Copy "abcdefghijklmnopqrstuvwxyzABCDEFGHIJKLMNOPQRSTUVWXYZ." to the red circle box below (without the quotation mark).


You can tick "Disable insertion triggers except 'Enter'". I prefer to do that otherwise it will automatically add some recommended string to your variables. For example, I want to define a string variable "String name", it will automatically add "String" to my variable like "String nameString". I feel this very annoying, so I usually tick this checkbox.


Saturday, 20 June 2020

How to make your External IP address in Google Cloud accessible through internet

This simple post is to teach you how to make your External IP address in Google Cloud accessible through internet. Here I assume you have created a VM instance in Google Cloud.


1, Find your external IP address

Go to your console in Google Cloud Platform. Then go to Compute Engine-> VM  Instances, you will see your instance list. From there you can find the External IP address of each instance like below:


2, Create firewall rule to make your server port accessible

Click "Setup Firewall Rules" link like below to enter the Firewall rules.


Click "Create new Firewall Rule" link on the top, and fill the firewall rule form.
a) Create a rule name;

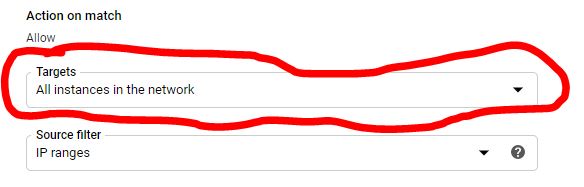
b) Change Targets to "All instances in the network";


c) Change Source IP ranges to "0.0.0.0/0". Here is important. You can use Source filter to filter the IP addresses you want to allow the access. If you want your website available to all networks, you need to enter "0.0.0.0/0";

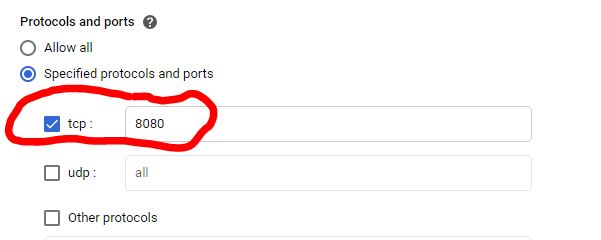
d) Specify the port number of your web server;

e) Click save;

3, Open browser and input the external IP address and server port number with URL link of your server, you should be able to see your web page.


Sunday, 2 February 2020

One-Time Pads


Why are One-Time Pads perfectly secure?

If the key is random, one-time pad is perfectly secret against ciphertext-only cryptanalysis(if the key is distributed reliably), even against brute force search.

So how can it beat brute force attack. Think about below example:

You have plain text: "Hello"
Your OTP key: 0x146EDC3425
Thus, your ciphered text: 0x5C0BB0584A

The attacker only knows ciphered text 0x5C0BB0584A in this scenario. From here he can try to decipher the message using brute force. But because the key is random, the deciphered text can be anything with equal possibility. So it can be "Think", "about", "Below", "force"... Anything meaningful words. So the attacker still cannot decide what is the true plain text, which the plain text set he gets from ciphered text is meaningless.


Thursday, 2 January 2020

Common useful SQL commands in MySQL

Safe Update Mode:

If Safe Update Mode is enabled in MySQL, then you may encounter an error "You are using safe update mode and you tried to update a table without a WHERE that uses a KEY column." when you use UPDATE or DELETE statements without a WHERE keyword (Sometimes my statements contain WHERE, but still got this error, does anyone know why?). When you see this error, you can solve it by turning off safe update mode. There are two ways to do so:
  1. You can put "SET SQL_SAFE_UPDATES=0;" in the beginning of your scripts;
  2. You can turn off safe update mode from workbench, by doing so, you don't need to put "SET SQL_SAFE_UPDATES=0;" in your scripts every time. Edit -> Preferences -> SQL Editor. Scroll down, you will find" Safe Updates(rejects UPDATEs and DELETEs with no restrictions)" checkbox. Uncheck the checkbox, you won't have the troubles anymore.


Delete table from database:

DELETE FROM Database.Table;


Find rows with duplicated keys:

SELECT
    Name,                                                     -- 
    COUNT(Name)                                      -- Here give the count of duplicate number
FROM
    Database.Table
GROUP BY Name                                     -- Group rows with HAVING condition
HAVING COUNT(Name) > 1;

Dump table from database:

mysqldump -u usernane -p password database_name table1 table2 table3 > tables.sql


Sunday, 15 December 2019

Basic understanding of TLS-PSK protocol

This post will talk about the basic understanding of TLS-PSK protocol. It will not cover TLS's history and how its mathematical algorithms work. Instead, what is TLS-PSK protocol and how it works will be discussed here. I prefer using diagrams to help explain things. Hopefully, it can give readers a very basic insights of TLS-PSK.

What is TLS-PSK

Before talking about what is TLS-PSK, I would like to introduce what is TLS first. TLS, Transport Layer Security, is a cryptographic protocol, aims to provide protection to end-to-end communication over the internet. It helps to protect network users from eavesdropping, tempering and so on.
Clear data transmission is dangerous, given that technical hacker can listen to the communication between two computers and steal sensitive data like user name, password and so on. This is situation where TLS can step in and protect you.

TLS has two steps: TLS handshake and data transmission. During TLS handshake, the communicating parties must agree on an session key and a cipher suite. This session key will be used to encrypt communication data until connection closes. But how to make sure the the two parties are using the same session key, or how to exchange the session key securely between them. There are many methods to do key exchange, TLS-PSK(Pre-Shared Key) is one of them. And it is a fast one, because it uses symmetric key algorithm and improve the performance. So it is usually used in embedded systems which usually have limited CPU power.

How does TLS-PSK work

TLS-PSK protocol uses symmetric keys as pre-shared key to exchange session keys. There are three cipher suites for TLS-PSK: symmetric key only authentication, DH key exchange authenticated with a pre-shared key and public key authentication. In this post, we will only talk about the symmetric key only PSK.

Before the handshake start, the session keys are already known by both communicating parties, because session key are derived from the pre-shared key, and pre-shared key is known by both. You may want to ask how pre-shared key is distributed. Well, there are many mechanisms used to share the pre-shared keys like GBA(Generic BootStrapping Architecture), which we will not talk about in this post. So since the session keys are already known before handshake, then why we still need to do handshake. Because we need to make sure the session keys to be used are the same, otherwise it will failed to do communication in application level. Besides, there are could be many keys stored in server, server needs to know which key to use. So usually during handshake, the client will send ClientKeyExchange request with PSK Identity to tell server which key to use.

Then how does TLS-PSK handshake works exactly, what are the steps. So in the following, I will use simplified diagrams to illustrate the TLS-PSK handshake process. Detail will not be discussed in each step. We can refer to RFC standard for the details.

1, Client sends a ClientHello message to server to initiate the communication;


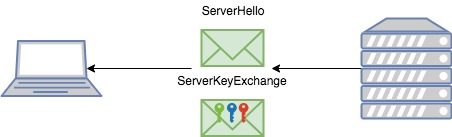
2, Server sends back a ServerHello message and ServerKeyExchange message. The ServerKeyExchange message will contain the session key hint, which helps to tell client what key labels server has; (Note,  represents a key label, not the actual session key, the actual key is )


3, After client confirms server has the same key label it wants to use. Then it will send a Finished message with ClientKeyExchange, which is encrypted by the session key with key label, and in the ClientKeyExchange message, it specifies which key label to use;


4, Server receives the Finished message, and get the key label from ClientKeyExchange, get the actual session key based on key label, then use session key to decrypt the finished message;

5, If decryption is successful, then send another finished message. On the client's side, it will repeat the same processor as step 4 since it knows which key to use;


6, If the decryption is passed too. Then the TLS-PSK handshake is done. Client and server can start to use the same session key to secure their communication on the application level.

Summary

So TLS-PSK is one of the TLS key exchange algorithms. It is simpler and faster compared to other asymmetric key exchange algorithms. You can find the details on RFC[4] standard.


(The elements in parenthesis are not included when the PSK key exchange algorithm is used. and "*" indicates a situation-dependent message that is not always sent [RFC 4])


Sunday, 2 June 2013

setjmp and longjmp

In short, functions setjmp and longjmp just work like label&goto instruction, except that the combination of label&goto only can be used within the same function which means you cannot goto the label outside the function. But the combination of setjmp and longjmp can be used anywhere in the whole program.

For example, we use label&goto to implement a jump function:

main()
{
     int a=1, b=2, c=0;
label:
     c=a+b;
     goto label;
     
}

Now we implement the same function using setjmp and longjmp:

typedef long jmp_buf[16];

main()
{
     int a=1, b=2, c=0;
     jmp_buff environment;
     setjmp (evironment);
     c=a+b;
     longjmp(evironment, 1);
}

So from above, we can see the jump buffer environment contains all the context around the setjmp function, so it works like label. And then the longjmp function will jump to the position where environment assigned.

The prototype of setjmp and longjmp:

int setjmp(jmp_buff env);
void longjmp(jmp_buff env, int val);

So function longjmp never return any value, because it will just jump the execution flow to setjmp position, but once jump to setjmp position, the setjmp function will return the value assigned by val which is the second parameter of longjmp function.

The first time setjmp function is called, it will always return 0. But after longjmp is executed, and jump to setjmp function, setjmp will never return 0. (Even if you set val to 0, setjmp will also return 1).

To make every thing more clearer, let's see an example from reference [1]:

  1. #include<stdio.h>  
  2. #include<setjmp.h>  
  3. jmp_buf ebuf;  
  4. int f2();  
  5. int main()  
  6.  {  
  7.        int i;  
  8.        printf("1");  
  9.        i=setjmp(ebuf);  
  10.        if(i==0)  
  11.        {  
  12.            f2();  
  13.            printf("This will not beprinted.");  
  14.        }  
  15.        printf("%d",i);  
  16.        return 0;  
  17. }  
  18. int f2()  
  19. {  
  20.        printf("2");  
  21.        longjmp(ebuf,3);  
  22. }  

The output of this example will print "1 2 3"


Reference: 
[1] http://blog.csdn.net/sunlylorn/article/details/7178575 

Tuesday, 13 November 2012

Orthogonal instruction set


Definition:
"In computer engineering, an orthogonal instruction set is an instruction set architecture where all instruction types can use all addressing modes. It is 'orthogonal' in the sense that the instruction type and the addressing mode vary independently."

The story of orthogonal instruction set:
In the past, because the memory is very precious, so the processor designer tends to make instructions as powerful as possible. So they hope one instruction can perform full function like get data from memory and then perform the calculation. They make all instructions can have all the addressing modes. By this way, one instruction can fetch data and do the calculation at the same time. 

But this will inscrease the complexity of the processor design. Also, accessing memory directly is very time-consuming, so some companies choose to use RISC processor (like ARM) which has a LOAD-STORE arhitecture to reduce the complexity of the design.

Examples: the DEC PDP-11 and Motorola 68000 are nearly orthogonal instruction sets, and VAX is an example of CPU with fully orthogonal instruction set.


References:

Monday, 20 August 2012

Short introduction of Scalar processor and Vector processor


Introduction:

Scalar processors are those what we talking about usually, like ARM, MSP430, Atemel ... 
They operate data with one unit, although now some processor can operate multiple data at the same time with multi-core. But it is still called Scalar processor.

Vector processor can operate data with vector as unit, which means it can work like MATLAB to calculate vector arithmetics directly, unlike the normal calculators have to go through a lot of steps to get the results of vector arithmetics.

So vector processor is a very good tool which can be used in graphic applications, such as high-resolution device, video game ... Actually, in 2000, IBM, Toshiba and Sony collaborated to create the Cell processor, consisting of one scalar processor and eight vector processors, which found use in the Sony PlayStation 3 among other applications.


But for the detail on the hardware implementation in Vector processors, and how are they different from the scalar processors? This will be the future topic, depends on my shcedule.

References:

Tuesday, 17 April 2012

Common mistakes in C programming


Common mistakes about subfunction:

1. Formal parameter issues:
 
void GetMemory(char *p)
{
p = (char *)malloc(100);
}

void Test(void)
{
char *str = NULL;
GetMemory(str);  
strcpy(str, "hello world");
printf(str);
}
Using a pointer variable as formal parameter is dangerous, because formal parameter only passes the value. So it only pass the address. 

So when allocate memory to formal paramter or any other defined pointer variables in subfunction, it will disapear after the end of subfunction. Insteadly, we can achieve the same function by passing the pointer variable who points the pointer variable who is going to be allocated.
void GetMemory2(char **p, int num)
{
*p = (char *)malloc(num);
if(*p==NULL)
printf(" Memory allocation fails!\n ");
}
void Test(void)
{
char *str = NULL;
GetMemory(&str, 100);
strcpy(str, "hello");  
printf(str);   
}

2. Variable life in subfunction:

char *GetMemory(void)
{  
char p[] = "hello world";
return p;
}
void Test(void)
{
char *str = NULL;
str= GetMemory();   
printf(str);
}

This program may not print the string "hello world", because although GetMemory function can return the address of the string, but the content has been destroyed after the end of the subfunction.

Monday, 16 April 2012

Pointer variable


Usually, pointer variables are with type difinition like char *, int *, long *, and like that. So when you want to  do some operations, compiler will use sizeof(type) as the unit. For example:


#include "stdio.h"

main()
{
    int a[3]={4, 5, 6};
    int *point1;
    point1=a;
    point1=point1+1;
    printf("%d\n", *point1);
    getchar();
}

Result: 5

However, we can use void * to define a point variable without type. But this variable cannot be operated because of the uncertain length of this variable. So before operation, you have to cast the variable to a specific type to do the operations. For example:


#include "stdio.h"

main()
{
    int a[3]={4, 5, 6};
    void *point2;

    point2=a;

    point2=(char *)point2+1;
    printf("%d\n", *(int *)point2);
    point2=(char *)point2+1;
    printf("%d\n", *(int *)point2);
    point2=(char *)point2+1;
    printf("%d\n", *(int *)point2);
    point2=(char *)point2+1;
    printf("%d\n", *(int *)point2);

    getchar();
}
Result:
1280  --- 00000101  00000000
5
1536  --- 00000110  00000000
6


Reference:
[1] C语言深度解剖读书笔记之----C语言基础测试题, http://blog.csdn.net/feitianxuxue/article/details/7334929

Sunday, 25 March 2012

POSIX thread programming


Introduction:
Using thread has many benefits. They share the same resources of their calling process (parent process), like global variables, open files and so on. Also they have their own thread ID, stacks, and so on. For more information, please refer to the old article "Multitasking in Embedded Linux" and reference [1]. Here we focus on how to use it.

The simplest thread programming:
#include <stdio.h>
#include <stdlib.h>
#include <pthread.h>

void *print_message(void *ptr)
{
    char *text;
    text=(char *)ptr;
    printf("%s \n", text);
}

main()
{
    pthread_t thread1, thread2;
    char *str1="I am thread1";
    char *str2="I am thread2";
    int T1ret, T2ret;

    /*Create two threads*/
    T1ret=pthread_create(&thread1, NULL, print_message, (void*) str1);
    T2ret=pthread_create(&thread2, NULL, print_message, (void*) str2);

    /*Wait for both threads to finish*/
    pthread_join(thread1, NULL);
    pthread_join(thread2, NULL);

    printf("T1 & T2 return: %d, %d\n", T1ret, T2ret);
}
Here we use pthread_create function to create a thread. There are four arguments in it.
First argument: used to return the thread ID.
Second argument: used to set the attributes of thread, like priority, schedule policy and so on. For detail, please refer to reference [1].
Third argument: assign the thread function which is the name of the function.
Four argument: used to pass value.

Usually at the end of the calling function, we use pthread_join(threadid, NULL) to wait for termination of that thread. This function is very important, because sometimes we need to allocate some memories for threads (refer to reference [2]). After all the threads terminates, we need to free these memories.


How to pass value to thread:

We can only use the fourth argument of pthread_create() to pass value. And it is declared as void *, so it is a totally free local variable. It can be converted to any type of variables by using casting.

Passing of pointer:
This is easy, because the fourth argument is a void pointer itself. So you can use the pointer as fourth argument. In thread, you need to cast it to the  type you like.

Passing of value:
Two ways to do this.
1. In thread_create() function, cast the variable to be passed to void * type. Then in thread, you can cast it to any type you want. For example:
rc=pthread_create(&threads[t], NULL, printhello. (void *)t);
In thread:
void *printhello(void *threadid)
{
    long taskid=(long)threadid;
    ...
}
2. Allocate a or several memories using malloc( ) function (refer to [2]) which return a pointer points to that location. Then you can use it like using pointer we talked in part 1. Here must remember to free the location using free( ) at the end of the function who called malloc( ).
long *taskids[NUM_THREADS];

for(t=0; t<NUM_THREADS; t++)
{
   taskids[t] = (long *) malloc(sizeof(long));
   *taskids[t] = t;
   printf("Creating thread %ld\n", t);
   rc = pthread_create(&threads[t], NULL, PrintHello, (void *) taskids[t]);
   ...
}

Passing of multiple parameters:
Use structure (struct) to this. Imagine yourself.
struct thread_data{
   int  thread_id;
   int  sum;
   char *message;
};

struct thread_data thread_data_array[NUM_THREADS];

void *PrintHello(void *threadarg)
{
   struct thread_data *my_data;
   ...
   my_data = (struct thread_data *) threadarg;
   taskid = my_data->thread_id;
   sum = my_data->sum;
   hello_msg = my_data->message;
   ...
}

int main (int argc, char *argv[])
{
   ...
   thread_data_array[t].thread_id = t;
   thread_data_array[t].sum = sum;
   thread_data_array[t].message = messages[t];
   rc = pthread_create(&threads[t], NULL, PrintHello, 
        (void *) &thread_data_array[t]);
   ...
}

Synchronization using Mutex:

Initialization of mutex:
pthread_mutex_t mutex1=PTHREAD_MUTEX_INITIALIZER;

Lock a mutex:
pthread_mutex_lock(&mutex1);

Unlock a mutex:
pthread_mutex_unlock(&mutex1);

Destroy a mutex:
pthread_mutex_destroy(&mutex1);

Set the stack size of thread:

pthread_attr_t attr;    // Here we define a attribute variable.

size_t mystacksize;
pthread_attr_getstacksize(&attr, &mystacksize);    // Here we get the stack size of variable attr. Remember it
                                                                             // belongs to variable attr, not the thread who calling it.

pthread_attr_setstacksize(&attr, mystacksize);     // Here we set the stack size of variable attr. Also remember
                                                                           // it belongs to variable attr.

Remember to put variable attr into the second argument of function pthread_create( ), like:
pthread_create(&threads[t], &attr, dowork, (void *) t);

At last, remember to destroy attr:
pthread_attr_destroy(&attr);

This procedure also can be applied to other attributes setting like joinable, scheduling, priority and so on.

References:
[2] malloc - Linux man page, http://linux.die.net/man/3/malloc
[6] pthread_attr_destroy( ) -- Destroy a thread attributes object, http://cursuri.cs.pub.ro/~apc/2003/resources/pthreads/uguide/users-g5.htm

Chapter 3 — The Molt

(This story is written by me and I will be posting it on Royal Road. Profile: https://www.royalroad.com/profile/1129550/fictions) Six fifty ...